
How to Install and Configure Consul Server on AlmaLinux 9
How to Install and Configure Consul Server on AlmaLinux 9
HashiCorp Consul is a distributed service mesh and service discovery solution providing a full-featured control plane for service networking. It offers health checking, dynamic DNS service discovery, a distributed key-value store, and secure service-to-service communication with mutual TLS across heterogeneous infrastructure.
This guide demonstrates how to install and configure a standalone Consul Server on AlmaLinux 9 following official HashiCorp best practices. You will learn how to configure administrative access, register HashiCorp’s official RPM repository, configure gossip encryption, manage the systemd service, and access the built-in web dashboard.
Prerequisites
- A running instance of AlmaLinux 9 with root shell access.
- At least 2 GB of RAM and 2 vCPUs.
- Outbound network connectivity to fetch HashiCorp RPM packages.
Key concepts
Consul Server and Raft Consensus
Consul operates in either client or server mode. Consul servers participate in the Raft consensus protocol, maintaining cluster state, storing service registration data, and handling leader election. In a single-node standalone environment, bootstrap_expect is set to 1 so the server can elect itself leader immediately.
Gossip Protocol and Encryption
Consul agents discover one another and manage membership using a Serf-based gossip protocol. To protect cluster topology and control messages from eavesdropping and tampering, gossip traffic is encrypted using a shared 32-byte base64 symmetric key generated via ‘consul keygen’.
HTTP API and Web UI
Consul exposes an HTTP API and a modern web dashboard on port 8500 by default. The UI provides real-time visibility into registered nodes, active services, health check states, and KV store entries across datacenters.
1. Set Up Administrative User greencloud
Create a dedicated non-root user named greencloud for administrative tasks. Granting this user membership in the wheel group enables sudo privileges, adhering to Linux security best practices before system-level software configuration begins.
Create a dedicated non-root user named greencloud for administrative tasks. Granting this user membership in the wheel group enables sudo privileges, adhering to Linux security best practices before system-level software configuration begins. Run the following command, preserved exactly from the validated recording, and check its result before moving on.
useradd -m -s /bin/bash greencloud
echo "greencloud:greencloud" | chpasswd
usermod -aG wheel greencloud
2. Add Official HashiCorp Repository
Install the core DNF package management plugins and register HashiCorp’s official RPM repository. This repository provides signed, verified Consul packages tailored for Enterprise Linux 9 distributions including AlmaLinux 9.
Install the software packages and supporting libraries needed for this part of the setup. Wait until the package manager finishes before continuing.
dnf install -y dnf-plugins-coreInstall the core DNF package management plugins and register HashiCorp’s official RPM repository. This repository provides signed, verified Consul packages tailored for Enterprise Linux 9 distributions including AlmaLinux 9. Run the following command, preserved exactly from the validated recording, and check its result before moving on.
dnf config-manager --add-repo https://rpm.releases.hashicorp.com/RHEL/hashicorp.repo3. Install Consul Package
Install the Consul server package from the newly registered HashiCorp repository using DNF. Once the installation completes, verify that the consul binary is functional and inspect the installed version.
Install the software packages and supporting libraries needed for this part of the setup. Wait until the package manager finishes before continuing.
dnf install -y consulInstall the Consul server package from the newly registered HashiCorp repository using DNF. Once the installation completes, verify that the consul binary is functional and inspect the installed version. Run the following command, preserved exactly from the validated recording, and check its result before moving on.
consul --version4. Configure Consul Server and Generate Gossip Encryption Key
Generate a shared 32-byte encryption key for gossip communication and configure Consul in server mode. Populate /etc/consul.d/consul.hcl with the datacenter identifier, data directory, encryption key, single-node bootstrap configuration, and Web UI enablement, then validate the configuration syntax.
Create the directories required by the application. Existing directories are preserved where the command uses the -p option.
mkdir -p /opt/consul
GOSSIP_KEY=$(consul keygen)
cat <<EOF > /etc/consul.d/consul.hcl
datacenter = "dc1"
data_dir = "/opt/consul"
encrypt = "${GOSSIP_KEY}"
server = true
bootstrap_expect = 1
ui_config {
  enabled = true
}
bind_addr = "0.0.0.0"
client_addr = "0.0.0.0"
EOF
chown -R consul:consul /opt/consul /etc/consul.d
chmod 640 /etc/consul.d/consul.hcl
chmod 750 /etc/consul.d
consul validate /etc/consul.d/5. Configure Firewall and Start Consul Service
If firewalld is active, the command adds TCP port 8500 for the HTTP API and Web UI, TCP ports 8300–8302, and UDP ports 8301–8302, then reloads firewalld. It then enables the Consul systemd unit and starts Consul without waiting for the start command to complete. During validation, systemd created the enablement symlink at /etc/systemd/system/multi-user.target.wants/consul.service. The command reached its execution timeout with exit code 124, so this step alone did not provide a completed active-state result. Subsequent validation evidence did show the Consul process and HTTP/Raft endpoints responding, including the leader address 192.168.122.32:8300.
If firewalld is active, the command adds TCP port 8500 for the HTTP API and Web UI, TCP ports 8300–8302, and UDP ports 8301–8302, then reloads firewalld. It then enables the Consul systemd unit and starts Consul without waiting for the start command to complete. During validation, systemd created the enablement symlink at /etc/systemd/system/multi-user.target.wants/consul.service. The command reached its execution timeout with exit code 124, so this step alone did not provide a completed active-state result. Subsequent validation evidence did show the Consul process and HTTP/Raft endpoints responding, including the leader address 192.168.122.32:8300. Run the following command, preserved exactly from the validated recording, and check its result before moving on.
if systemctl is-active --quiet firewalld; then
  firewall-cmd --permanent --add-port=8500/tcp
  firewall-cmd --permanent --add-port=8300-8302/tcp
  firewall-cmd --permanent --add-port=8301-8302/udp
  firewall-cmd --reload
fi
systemctl enable consul
systemctl start --no-block consul
for i in {1..30}; do
  if ps -C consul -o comm= | grep -qx consul && ss -ltn | grep -qE '(:8500|:8300)' && leader=$(curl -fsS http://127.0.0.1:8500/v1/status/leader) && [ -n "$leader" ]; then
    break
  fi
  if [ "$i" -eq 30 ]; then
    echo "Consul readiness failed" >&2
    systemctl status consul --no-pager >&2
    exit 1
  fi
  sleep 1
done
ps -C consul -o pid=,comm=
ss -ltn | grep -E '(:8500|:8300)'
curl -fsS http://127.0.0.1:8500/v1/status/leader6. Verify Consul Cluster Membership and Leader Election
Poll the Consul agent until cluster convergence is achieved and the server confirms its status. Use ‘consul members’ to verify that the local node is registered as an active server and query the HTTP status API to ensure the Raft leader has been established.
Poll the Consul agent until cluster convergence is achieved and the server confirms its status. Use ‘consul members’ to verify that the local node is registered as an active server and query the HTTP status API to ensure the Raft leader has been established. Run the following command, preserved exactly from the validated recording, and check its result before moving on.
for i in {1..15}; do
  if consul members 2>/dev/null | grep -q 'alive'; then
    break
  fi
  sleep 1
done
consul members
curl -s http://127.0.0.1:8500/v1/status/leader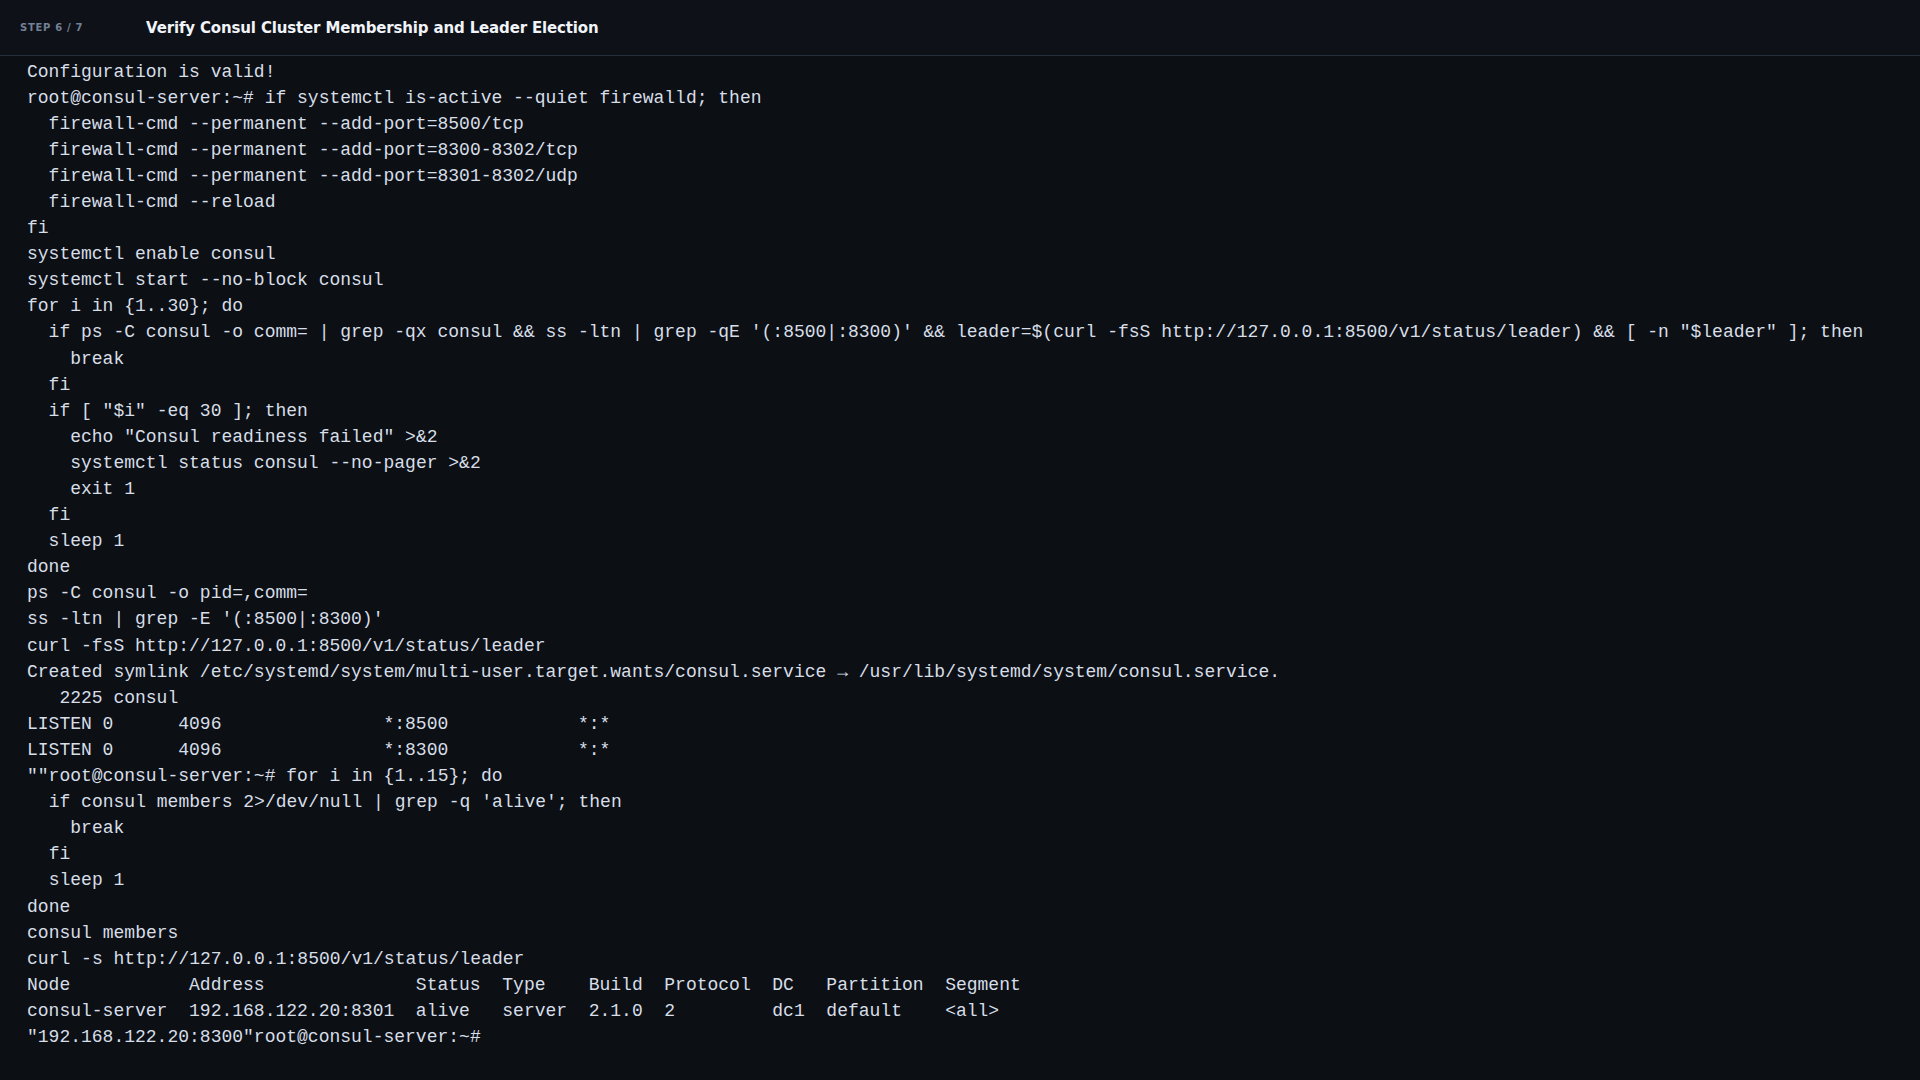
7. Verify the Web UI
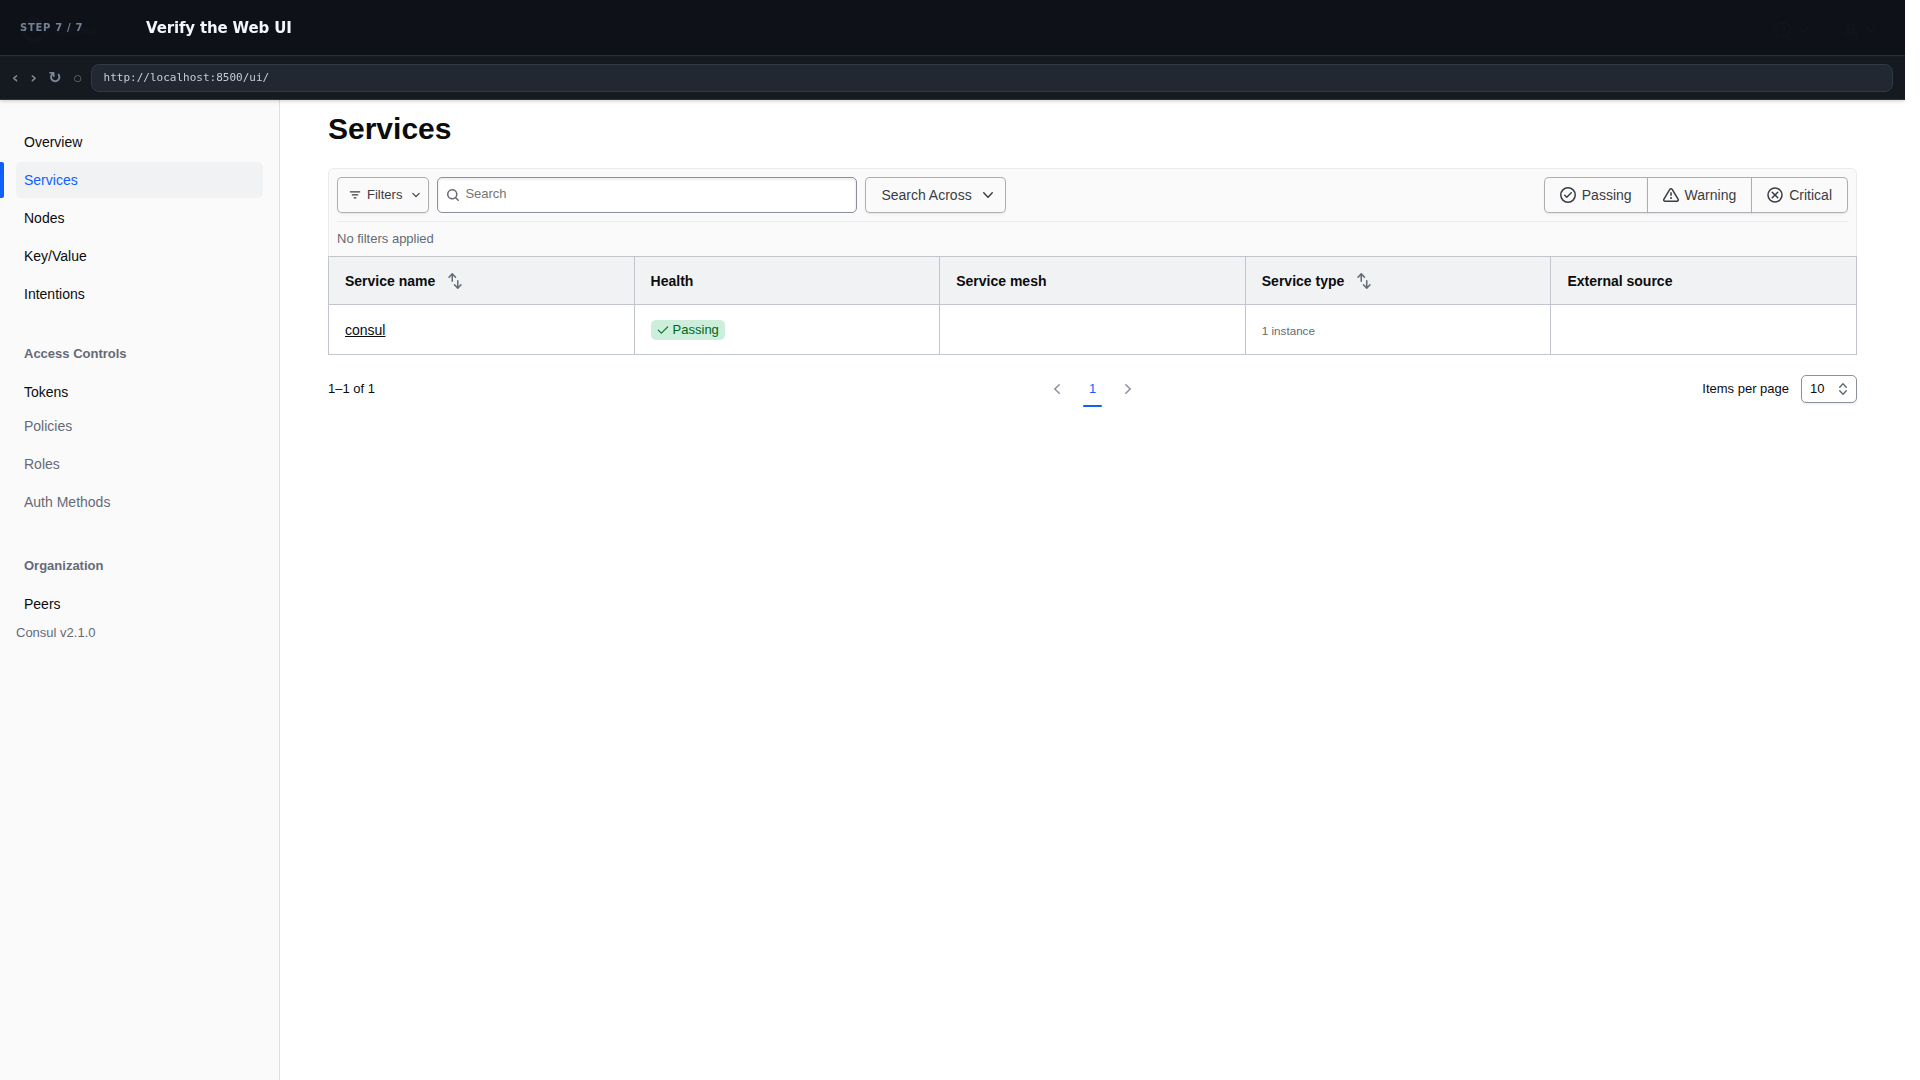
Open the Web UI discovered from the running application and prove the usable application state. Planner’s original desired UI outcome (non-executable until observed): The Consul Web UI interface loads and displays the services and cluster overview for datacenter dc1.
Open http://YOUR_IP_ADDRESS:8500/ui/ in your browser.
Replace YOUR_IP_ADDRESS with your server IP, or YOUR_DOMAIN with a domain pointing to your server, as applicable. The video shows the actual lab address, which can differ from yours. Use HTTPS only if it has been configured.
How the final setup works
The Consul daemon runs as a dedicated systemd service managed under the consul system user. It listens on TCP/UDP 8301-8302 for cluster gossip, TCP 8300 for Raft RPC synchronization, and TCP 8500 for HTTP API queries and web UI access. In this standalone topology, the server acts as its own datacenter leader (dc1) and binds client endpoints to all interfaces.
Conclusion
You have successfully installed and configured a standalone HashiCorp Consul Server on AlmaLinux 9. The server has been initialized with gossip encryption, enabled under systemd, and verified through both CLI tooling and the web management dashboard. From here, you can register microservices, connect additional client agents across your infrastructure, or configure Access Control Lists (ACLs) to enforce secure service communication.
